
Resource Requests & Limits
“Resource Request” and a “Resource Limit” when defining how many resources a container within a pod should receive
On this page:
Containerising applications and running them on Kubernetes does not mean we can forget all about resource utilization. Our thought process may have changed because we can easily scale out our application as demand increases. We need to consider frequently how our containers might fight with each other for resources. Resource requests and limits can be used to help stop the “noisy neighbour” problem in a Kubernetes Cluster.
Resource Requests
To put things simply, a resource request specifies the minimum amount of resources a container needs to successfully run. Thought of in another way, this is a guarantee from Kubernetes that you’ll always have this amount of either CPU or Memory allocated to the container.
Why would you worry about the minimum amount of resources guaranteed to a pod? Well, it's to help prevent one container from using up all the node’s resources and starving the other containers from CPU or memory. For instance, if I had two containers on a node, one container could request 100% of that node's processor. Meanwhile, the other container would likely not be working very well because the processor is being monopolized by its “noisy neighbour”.
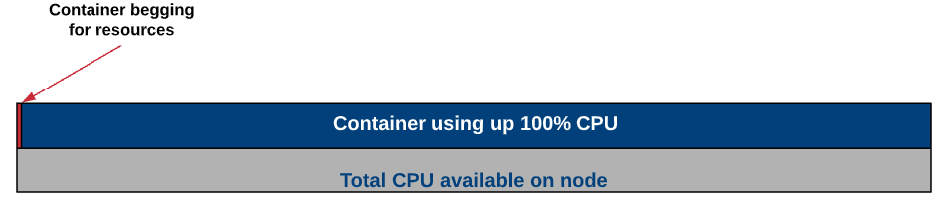
What a resource request can do, is to ensure that at least a small part of that processor’s time is reserved for both containers. This way if there is resource contention, each pod will have a guaranteed, minimum amount of resources in which to still function.
Resource Limits
As you might guess, a resource limit is the maximum amount of CPU or memory that can be used by a container. The limit represents the upper bounds of how much CPU or memory that a container within a pod can consume in a Kubernetes cluster, regardless of whether or not the cluster is under resource contention.
Limits prevent containers from taking up more resources on the cluster than you’re willing to let them.
Common Practices
As a general rule, all containers should have a request for memory and CPU before deploying to a cluster. This will ensure that if resources are running low, your container can still do the minimum amount of work to stay in a healthy state until the resources free up again (hopefully).
Limits are often used in conjunction with requests to create a “guaranteed pod”. This is where the request and limit are set to the same value. In that situation, the container will always have the same amount of CPU available to it, no more or less.
At this point, you may be thinking about adding a high “request” value to make sure you have plenty of resources available for your container. This might sound like a good idea but have dramatic consequences for scheduling on the Kubernetes cluster. If you set a high CPU request, for example, 2 CPUs, then your pod will ONLY be able to be scheduled on Kubernetes nodes that have 2 full CPUs available that aren’t reserved by other pods’ requests. In the example below, the 2 vCPU pods couldn’t be scheduled on the cluster. However, if you were to lower the “request” amount to say 1 vCPU, it could.
Resource Requests and Limits – In Action
CPU Limit Example
Let us try out using a CPU limit on a pod and see what happens when we try to request more CPU than we’re allowed to have. Before we set the limit though, let us look at a pod with a single container under normal conditions. I’ve deployed a resource consumer container in my cluster and by default, you can see that I am using 1m CPU(cores) and 6 Mi(bytes) of memory.
NOTE: CPU is measured in millicores so 1000m = 1 CPU core. Memory is measured in Megabytes.

Ok, now that we have seen the “no-load” state, let us add some CPU load by making a request to the pod. Here, we increased the CPU usage on the container to 400 millicores.

After the metrics start coming in, you can see that we got roughly 400m used on the container as you’d expect to see.

Now we have deleted the container and will edit the deployment manifest so that it has a limit on CPU.
After redeploying the container and again increasing the CPU load to 400m, we can see that the container is throttled to 300m instead. We have effectively “limited” the resources the container could consume from the cluster.

CPU Requests Example
Next, we deployed two pods into the Kubernetes cluster and those pods are on the same worker node for a simple example of contention. We have got a guaranteed pod that has 1000m CPU set as a limit but also as a request. The other pod is unbounded, meaning there is no limit on how much CPU it can utilize.
After the deployment, each pod is really not using any resources as you can see here.

We make a request to increase the load on the non-guaranteed pod.

And if we look at the container's resources you can see that even though the container wants to use a 2000m CPU, it is actually using a 1000m CPU only. The reason for this is that the guaranteed pod is guaranteed a 1000m CPU, whether it is actively using that CPU or not.

Summary
Kubernetes uses resource requests to set a minimum amount of resources for a given container so that it can be used if it needs it. You can also set a resource limit to set the maximum amount of resources a pod can utilize.
Taking these two concepts and using them together can ensure that your critical pods always have the resources that they need to stay healthy. They can also be configured to take advantage of shared resources within the cluster.
Be careful setting resource requests too high so your Kubernetes scheduler can still schedule these pods. Good luck!
Last updated
Was this helpful?