
Setup Jenkins - Docker way
Jenkins for Build, Test and Deployment Automation
While we are adopting the Microservices architecture, it also demands to have an efficient CI/CD tools like jenkins. Along the cloud-native application developement and deployment jenkins can also be run cloud-native.
Since all processes, including software build, test and deployment, are performed every two or four weeks, this is an ideal playground for automation tools like Jenkins: After the developer commits a code change to the repository, Jenkins will detect this change and will trigger the build and test process. So Let's setup Jenkins as a docker container. Step-by-step.
Installing Jenkins the Docker Way
Tools and Versions used
VM or EC2 Instance or a Standalone on-premisis machin
Docker 1.12.1
Jenkins 2.32.2
Job DSL Plugin 1.58
Prerequisites:
Ubuntu or an Liniux Machine
Free RAM for the a VM/Machine >~ 4 GB.
Docker Host is available.
Tested with 3 vCPU (2 vCPU might work as well).
Step 1: Install a Docker on the Host you provisioned for jenkins and Connect to the Host via SSH
If you are using an host already has docker installed, you can skip this step. Make sure that your host has enough memory.
We will run Jenkins in a Docker container in order to allow for maximum interoperability. This way, we always can use the latest Jenkins version without the need to control the java version used.
If you are new to Docker, you might want to read this blog post.
Installing Docker on Windows and Mac can be a real challenge, but possible: here we will see an efficient way by using linux machine.
Prerequisites of this step:
I recommend to have direct access to the Internet: via Firewall, but without HTTP proxy.
Administration rights on you computer.
Step 2: Download Jenkins Image
This extra download step is optional, since the Docker image will be downloaded automatically in step 3, if it is not already found on the system:
The version of the downloaded Jenkins image can be checked with following command:
We are using version 2.9.13 currently. If you want to make sure that you use the exact same version as I have used in this blog, you can use the imagename jenkins:2.19.3 in all docker commands instead of jenkins only.
Note: The content of the jenkins image can be reviewed on this link. There, we find that the image has an entrypoint
/bin/tini -- /usr/local/bin/jenkins.sh, which we could override with the--entrypoint bashoption, if we wanted to start a bash shell in the jenkins image. However, in Step 3, we will keep the entrypoint for now.
Step 3: Start Jenkins in interactive Terminal Mode
In this step, we will run Jenkins interactively (with -it switch instead of -d switch) to better see, what is happening. But first, we check that the port we will use is free:
Since we see that one of the standard ports of Jenkins (8080, 50000) is already occupied and I do not want to confuse the readers of this blog post by mapping the port to another host port, I just stop the cadvisor container for this „hello world“:
Jenkins will be in need of a persistent storage. For that, we create a new folder on the Docker host:
Note: The content of the jenkins image can be reviewed on this link. There, we find that the image has an entrypoint
/bin/tini -- /usr/local/bin/jenkins.sh, which we could override with the--entrypoint bashoption, if we wanted to start a bash shell in the jenkins image.
We start the Jenkins container with the jenkins_home Docker host volume mapped to /var/jenkins_home:
Step 4: Open Jenkins in a Browser
Now we want to connect to the Jenkins portal. For that, open a browser and open the URL
In our case, Jenkins is running in a container and we have mapped the container-port 8080 to the local port 8080 of the Docker host. On the Docker host, we can open the URL.
The Jenkins login screen will open:
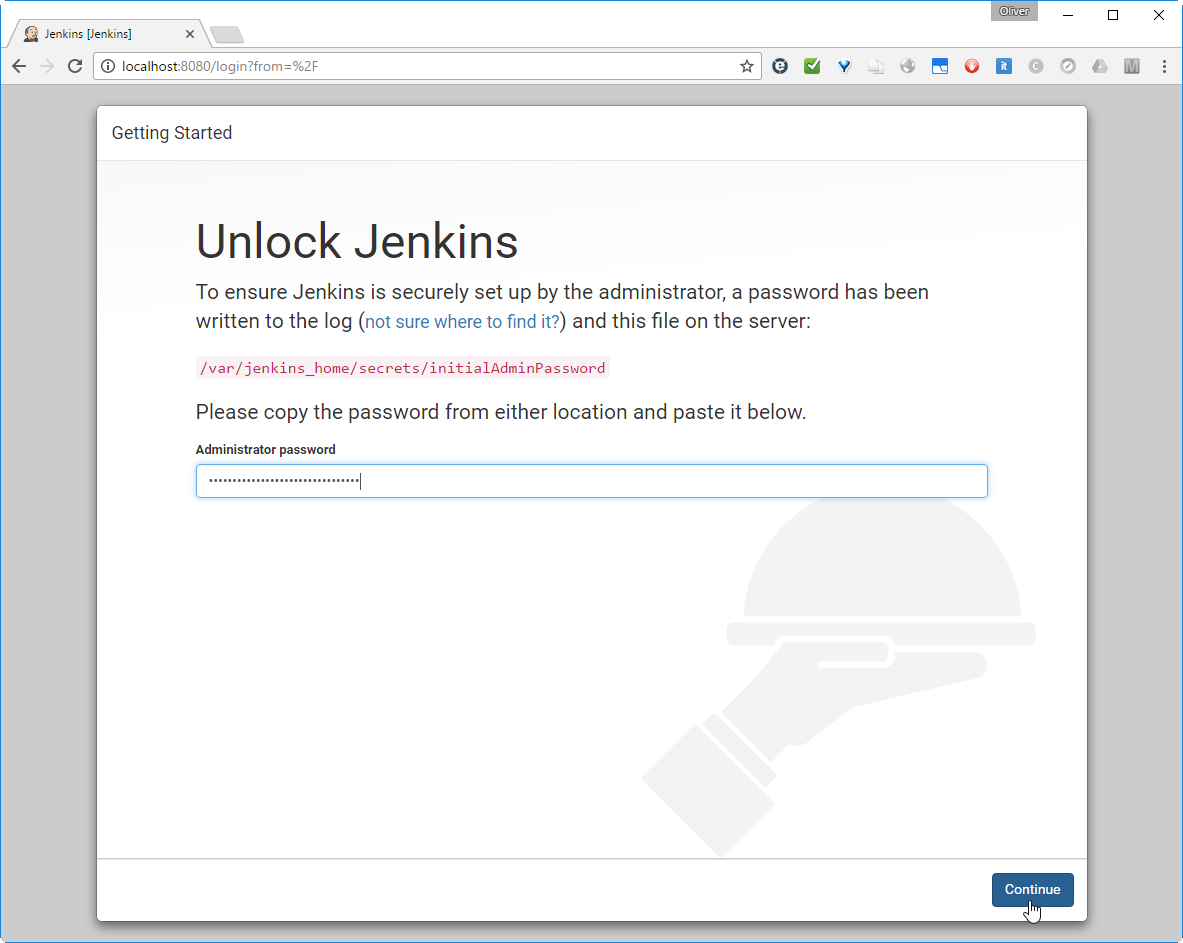
The admin password can be retrieved from the startup log, we have seen above (0c4a8413a47943ac935a4902e3b8167e), or we can find it by typing
on the mapped jenkins_home folder on the Docker host.
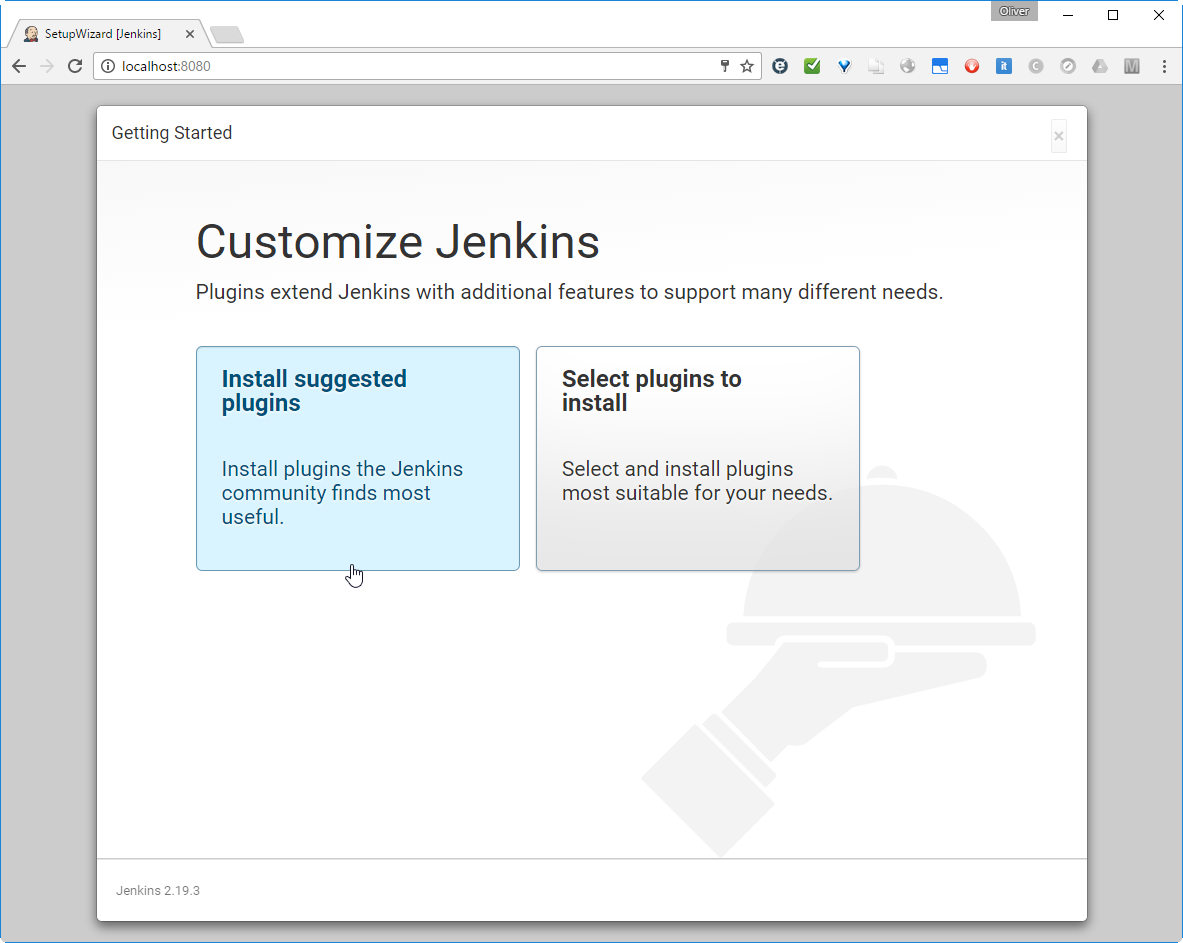
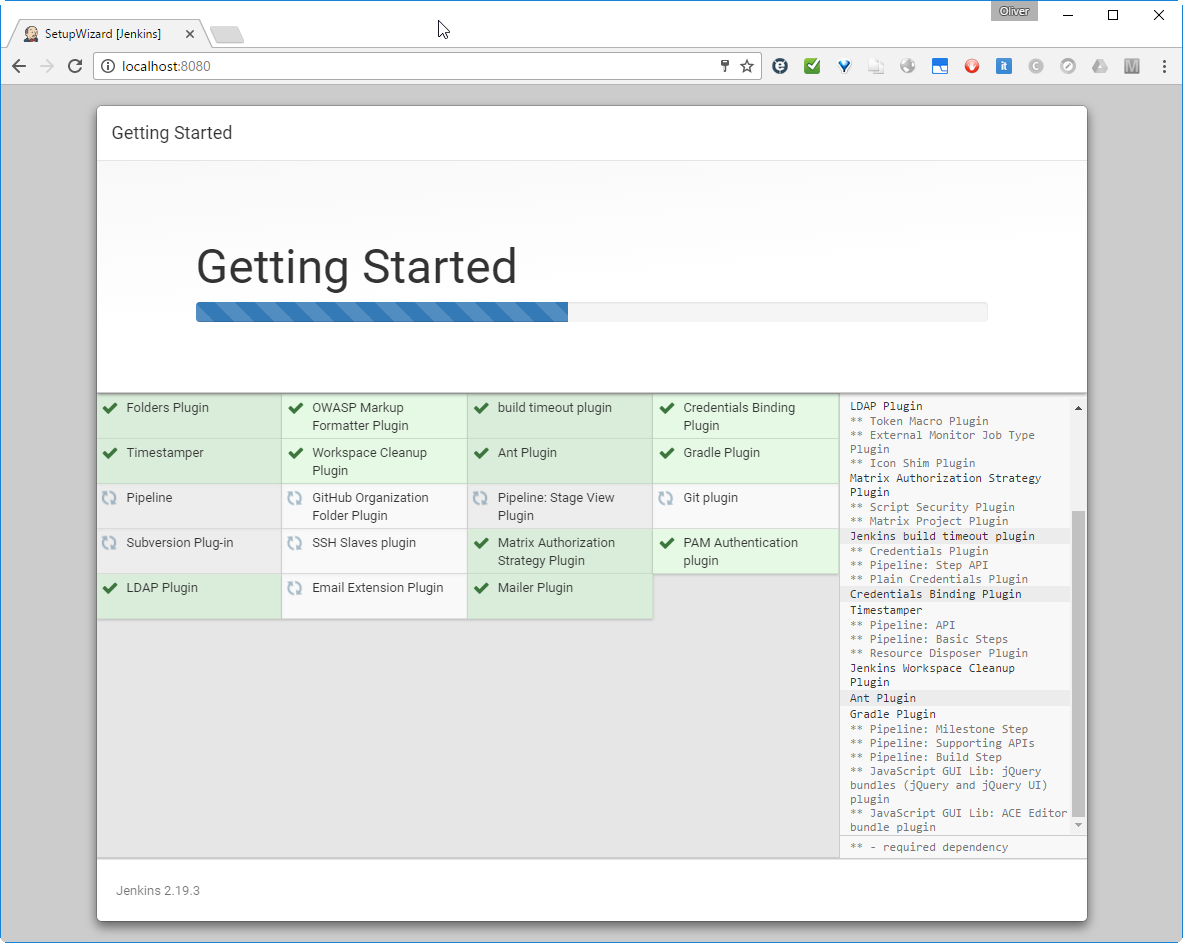
Step 5: Install Plugins
Let us install the suggested plugins:
This may take a while to finish:
Step 6: Create an Admin User and log in
Then we reach a page, where we can create an Admin user:

Let us do so and save and finish.
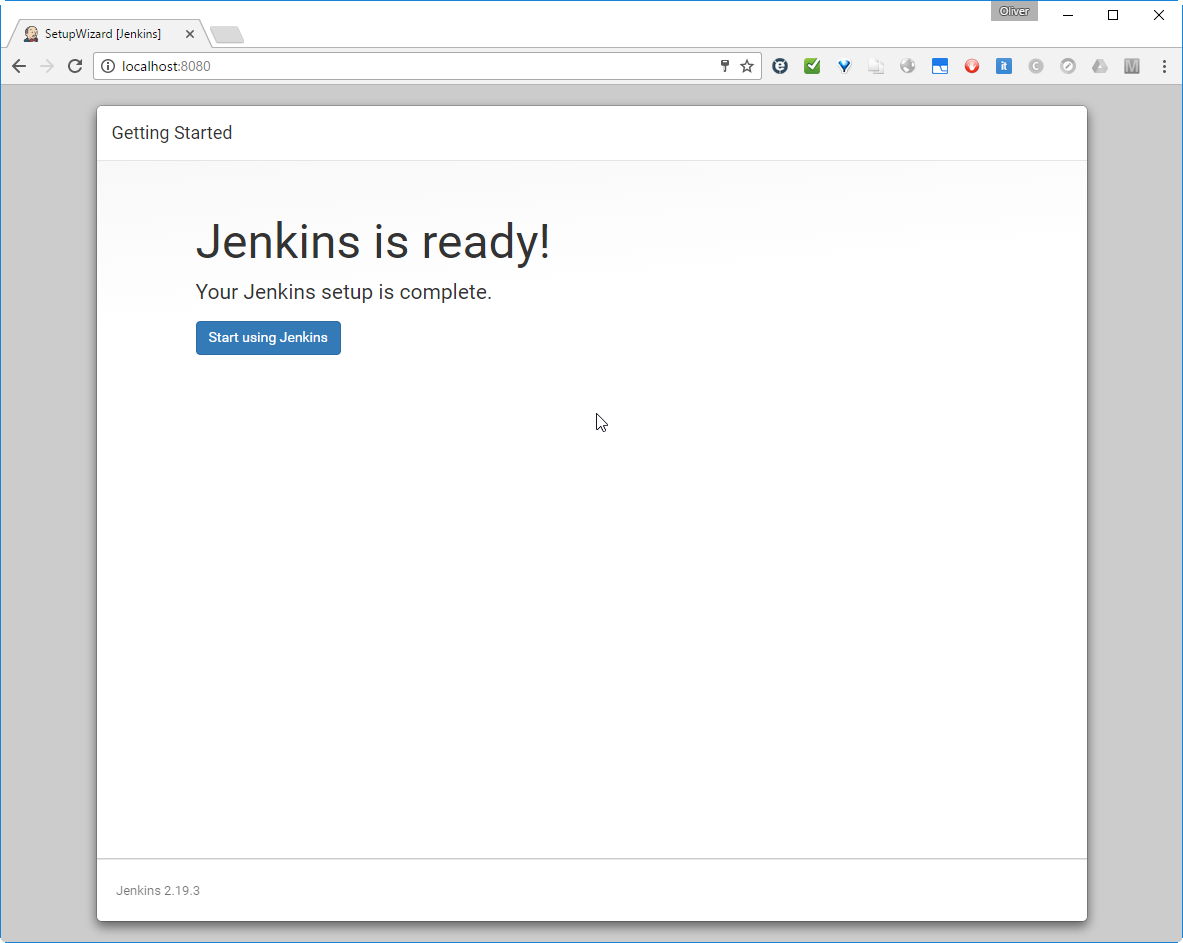
Note: After this step, I have deleted the Jenkins container and started a new container attached to the same Jenkins Home directory. After that, all configuration and plugins were still available and we can delete containers after usage without loosing relevant information.
I have had a dinner break at this point. Maybe this is the reason I got following message when clicking the „Start using Jenkins“ button?
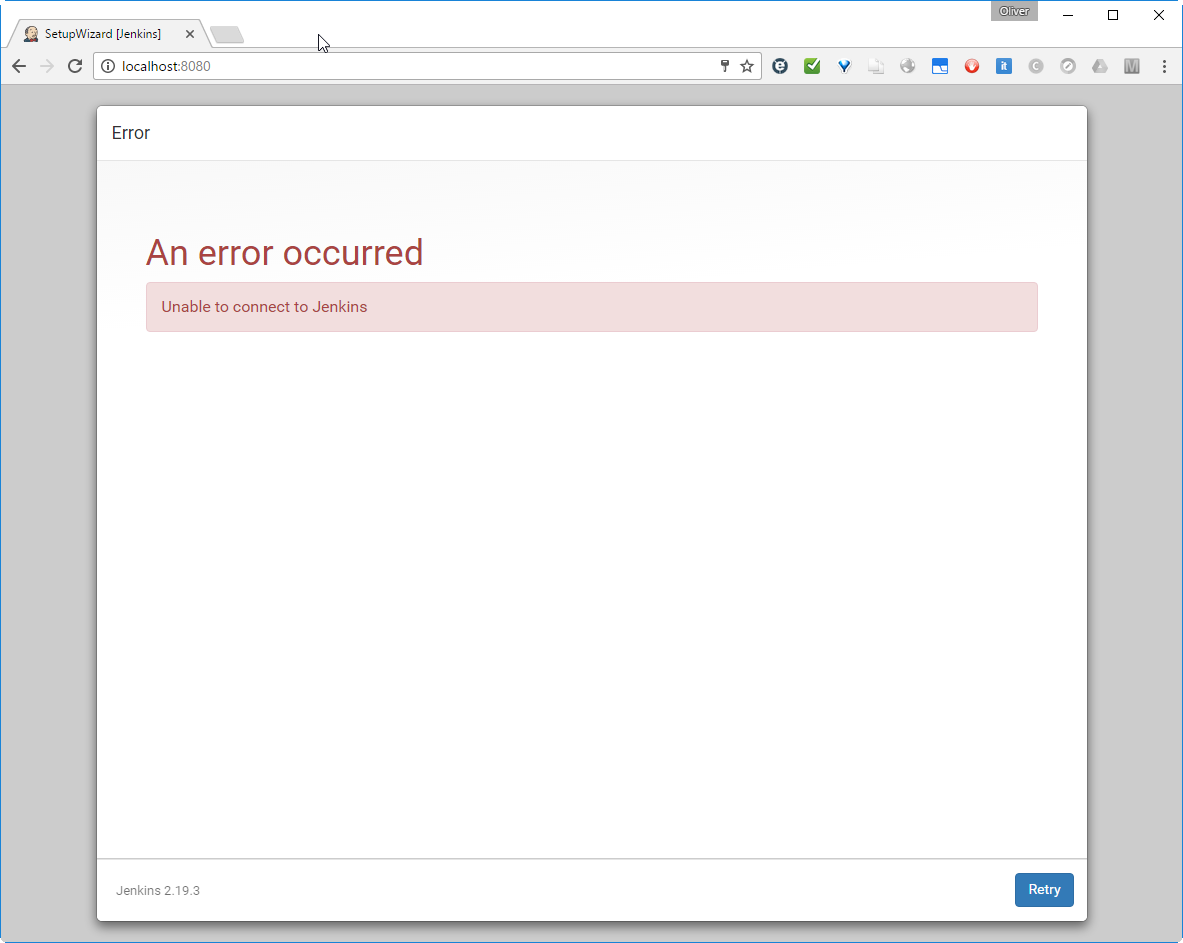
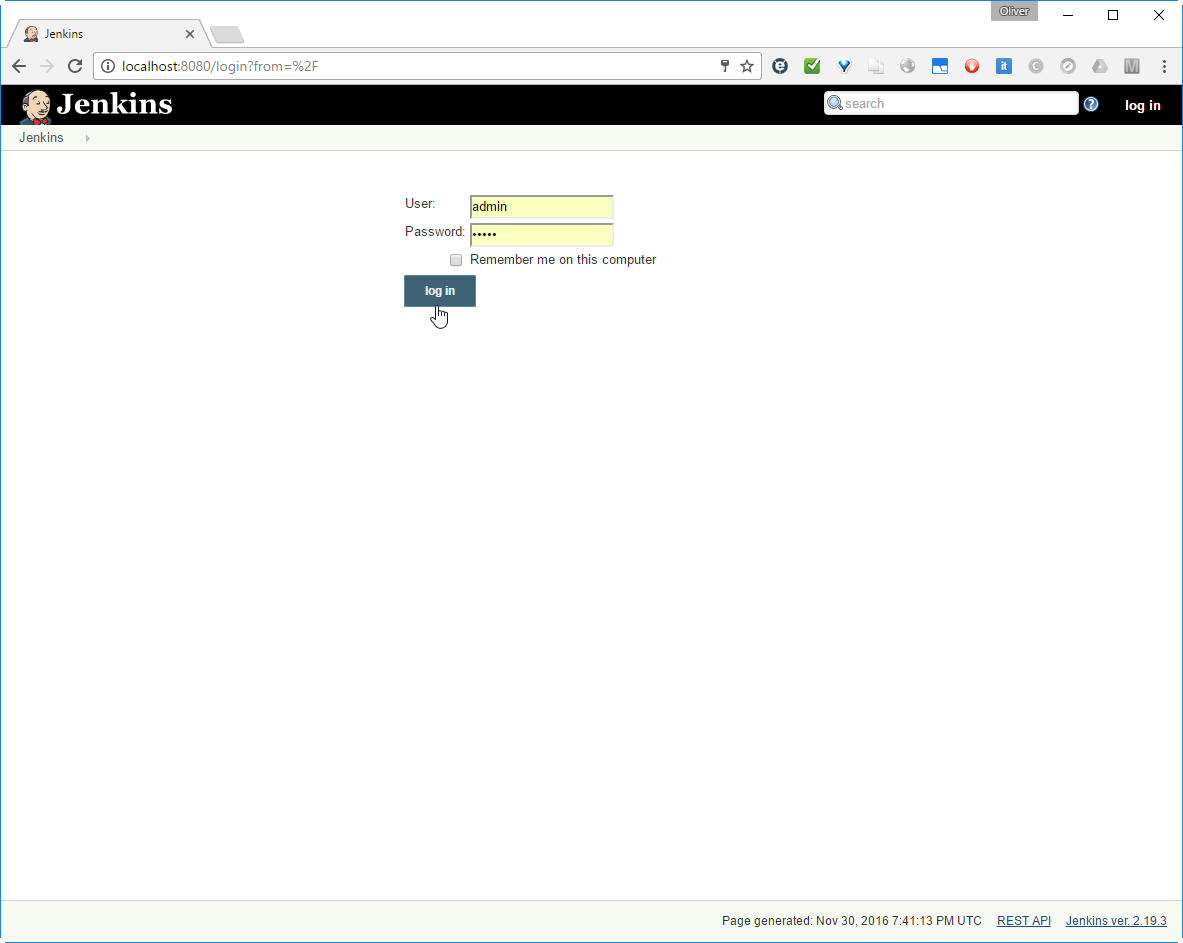
What ever. After clicking „retry“, we reach the login page:
Create a New Job
In the nex, we will create our first Jenkins job. I plan to trigger the Maven and/or Gradle build of a Java executable file upon detection of a code change.
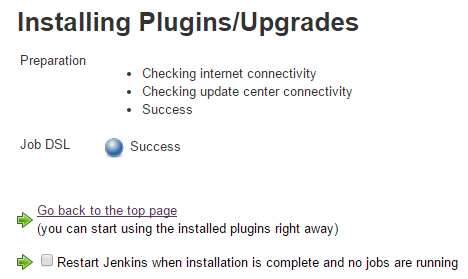
Step 2: Install the Job DSL Plugin
The Job DSL Plugin can be installed like any other Jenkins plugin:
-> ![]() ->
-> ![]() ->
-> ![]()
-> ![]() (with dash between job and dsl; wait for the filter to become active and do not press enter, otherwise you will get an error message)
(with dash between job and dsl; wait for the filter to become active and do not press enter, otherwise you will get an error message)
-> ![]()

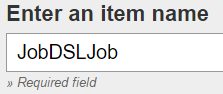
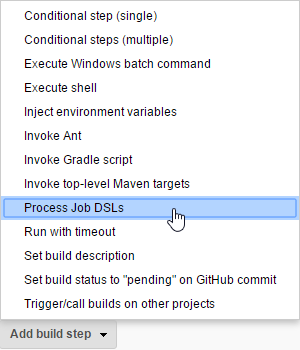
Step 3: Create Job DSL Jenkins Project
We create a Job DSL Job like follows:
-> ![]()
-> ![]()

-> ![]()
Step 4: Configure Job DSL Project
-> 
-> if you have got a Github account, fork this open source Java Hello World software (originally created by of LableOrg) that will allow you to see, what happens with your Jenkins job, if you check in changed code. Moreover the hello world software allows you to perform JUnit 4 tests, run PowerMockito Mock services, run JUnit 4 Integration tests and calculate the code coverage using the tool Cobertura.
-> ![]()
-> insert:
here, exchange the username oveits by your own Github username.
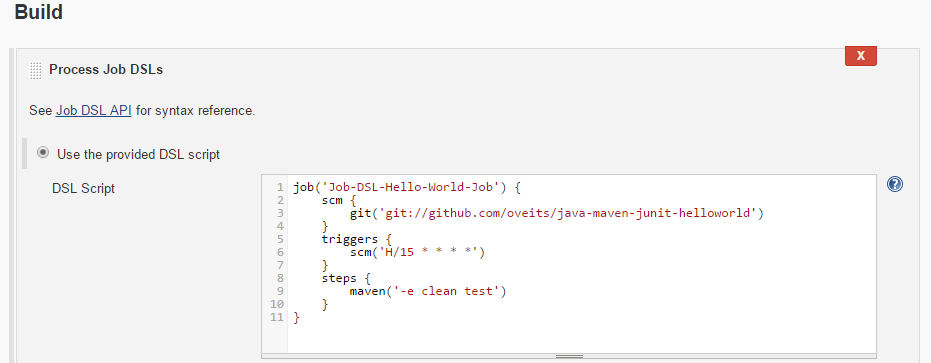
-> ![]()
Step 5: Prepare Maven Usage
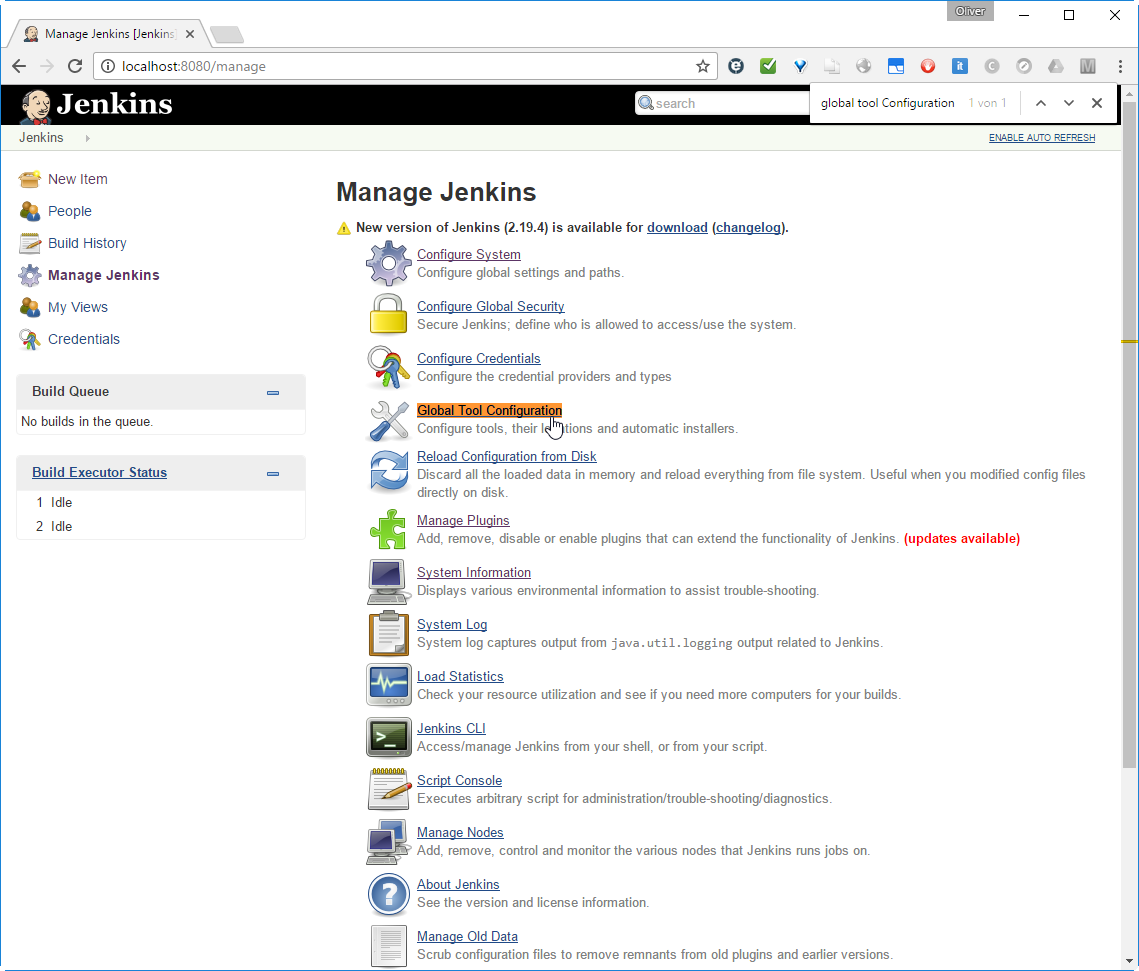
Goto Jenkins -> Manage Jenkins -> Global Tool Configuration (available for Jenkins >2.0)
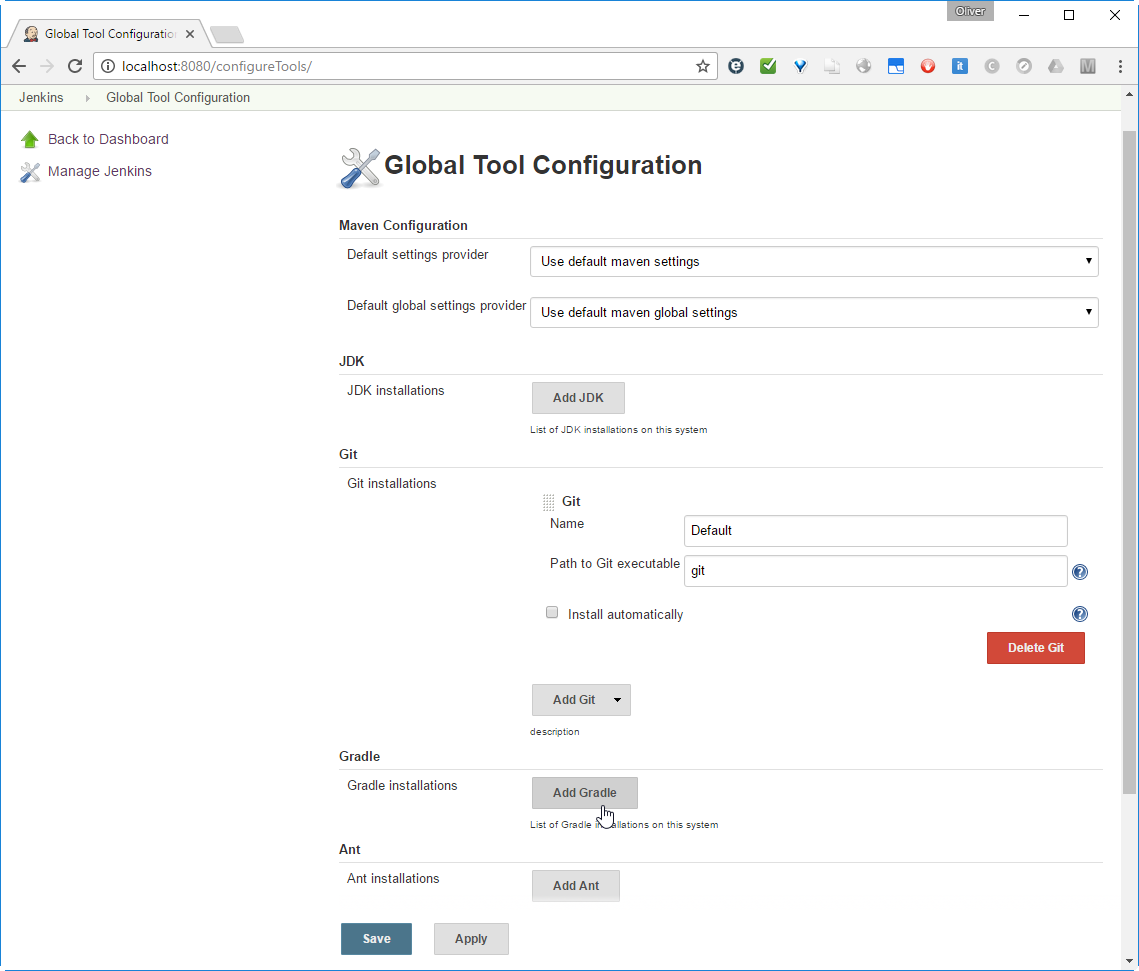
Scroll down to Maven -> ![]()
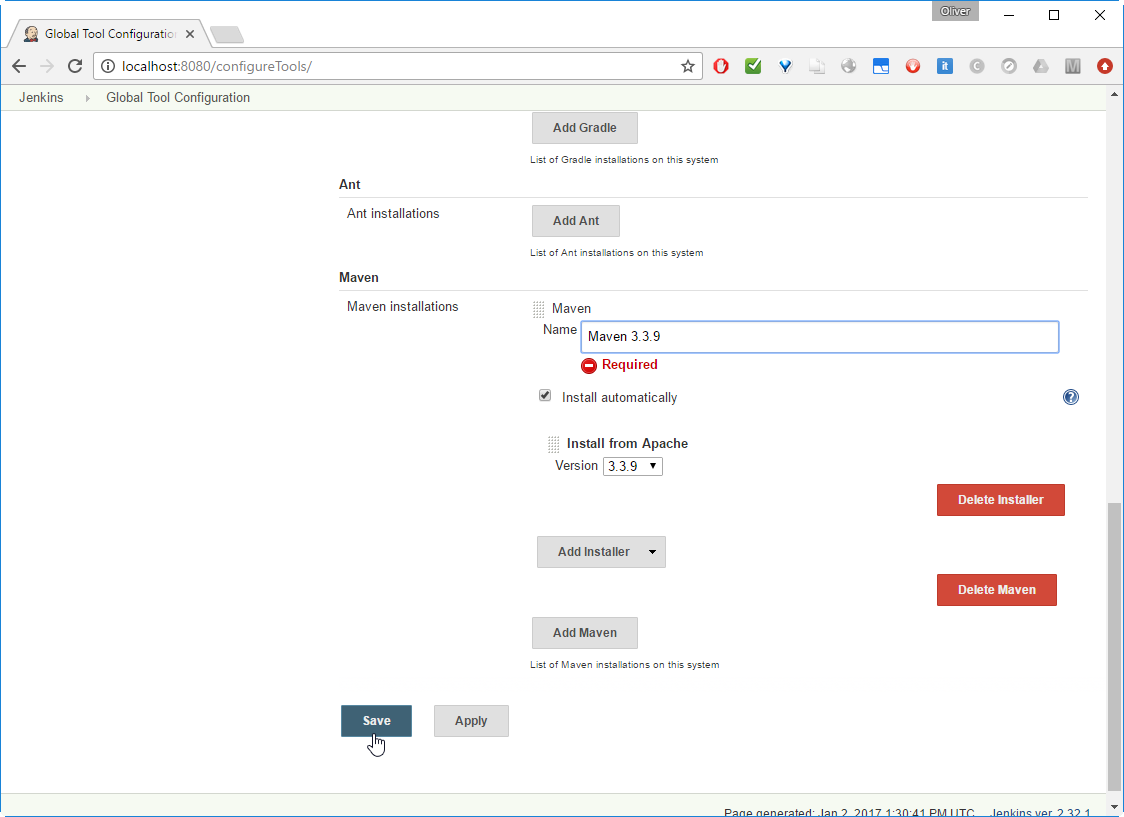
-> choose Version (3.3.9 in my case)
-> Add a name („Maven 3.3.9“ in my case)
-> ![]()
Since we have checked „Install automatically“ above, I expect that it will be installed automatically on first usage.
Step 6: Prepare Git Usage
As described in this StackOverflow Q&A, we need to add the Git username and email address, since Jenkins tries to tag and commit on the Git repo, which requires those configuration items to be set. For that, we perform:
-> ![]()
-> ![]()
-> 
-> scroll down to „Git plugin“
->

Step 7: Create Jenkins Job from Code
Step 7.1 Build Project
-> ![]()
Step 7.2 (optional): Check Console Output
-> ![]()
-> ![]()
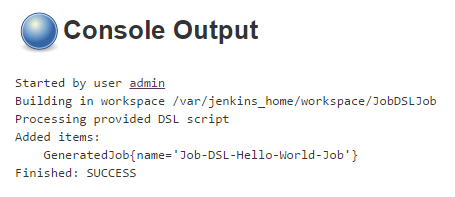
-> ![]()
Step 7.3: Review automatically built Project
-> ![]()
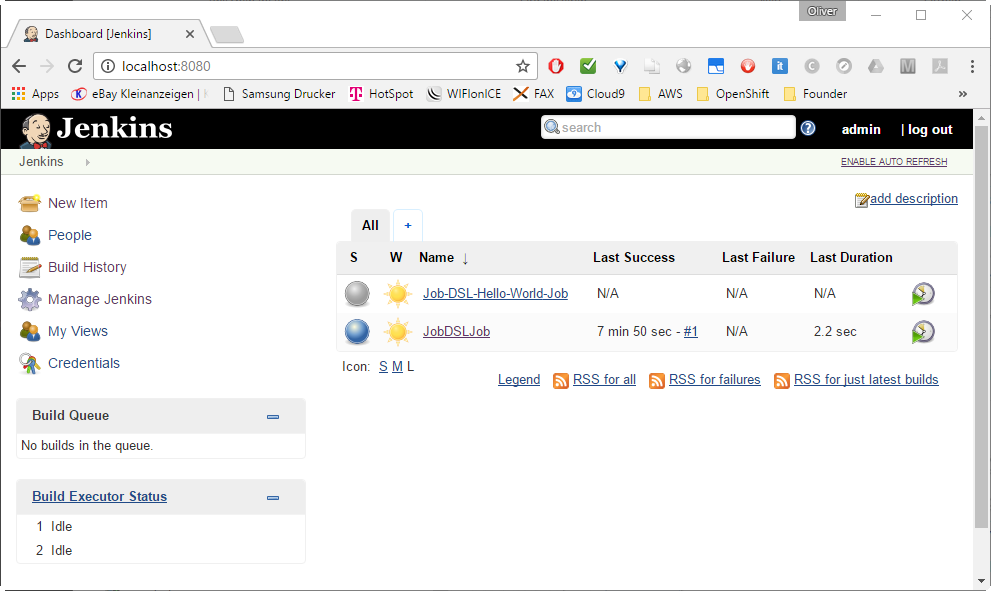
-> ![]()
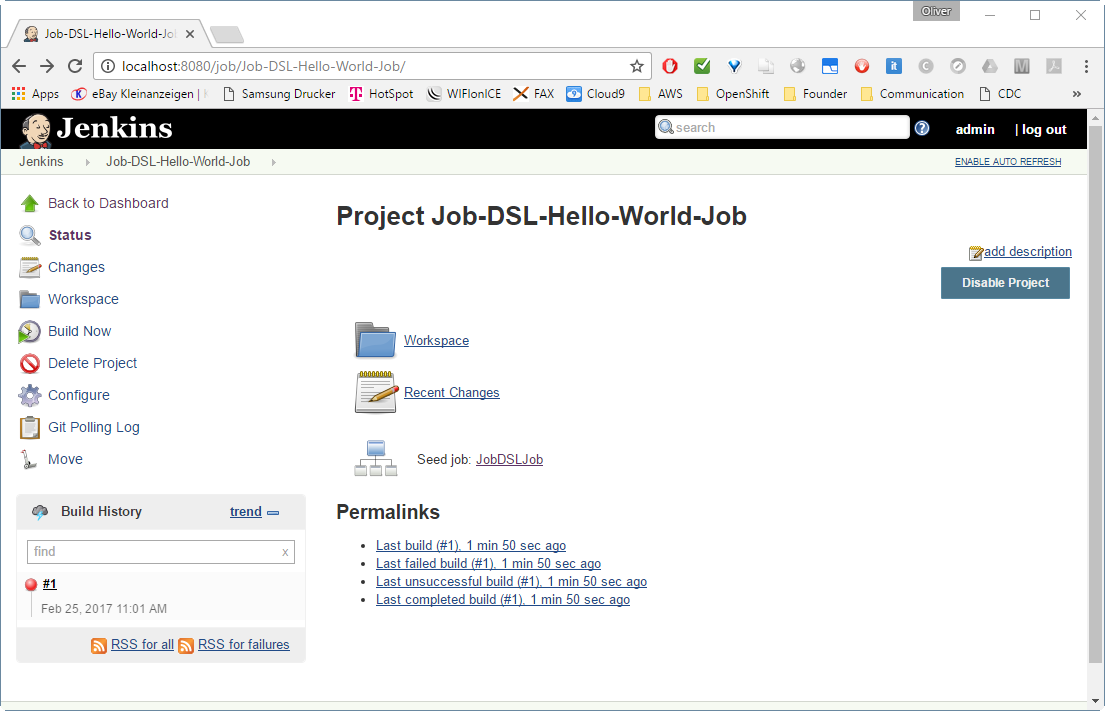
This is showing a build failure, since I had not performed Step 5 and 6 before. In your case, it should be showing a success (in blue). If you are experiencing problems here, check out the Appendices below.
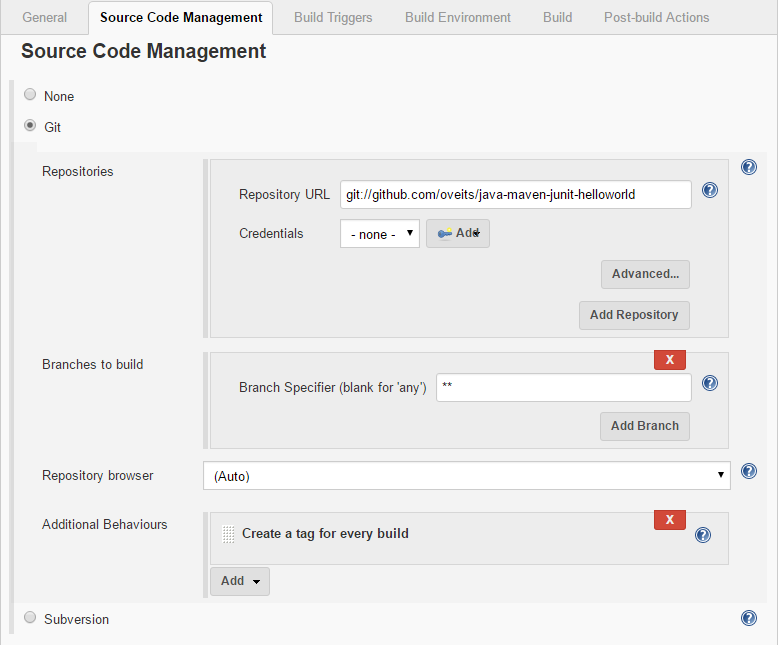
-> ![]()
-> scroll down to Source Code Management
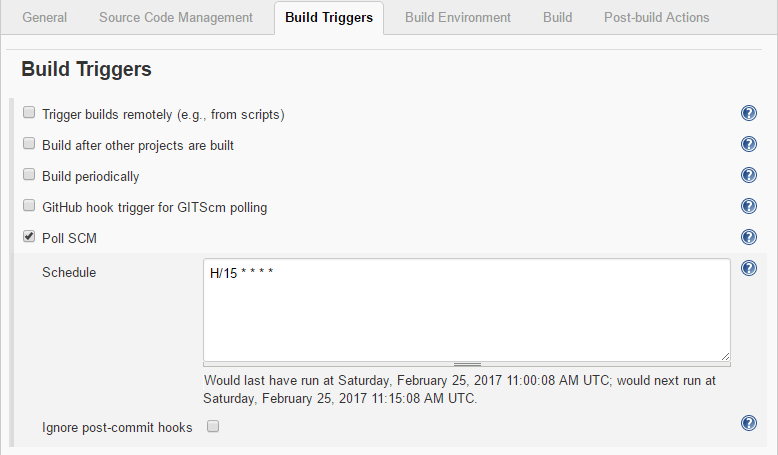
-> Scroll down to Build Triggers
-> Scroll down to Build
-> verify that „Maven 3.3.9“ is chosen as defined in Step 5
-> enter „-e clean test“ as Maven Goal
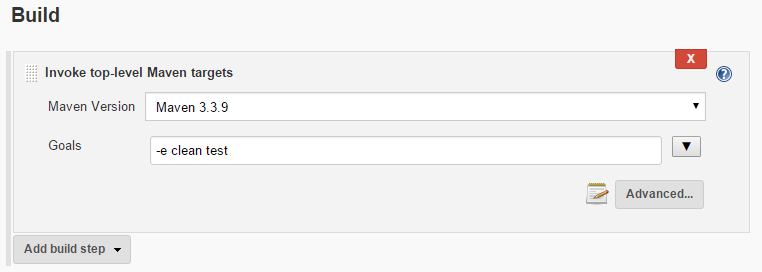
-> ![]()
See, what happens by clicking on:
-> Build History
-> #nnn
-> ![]()
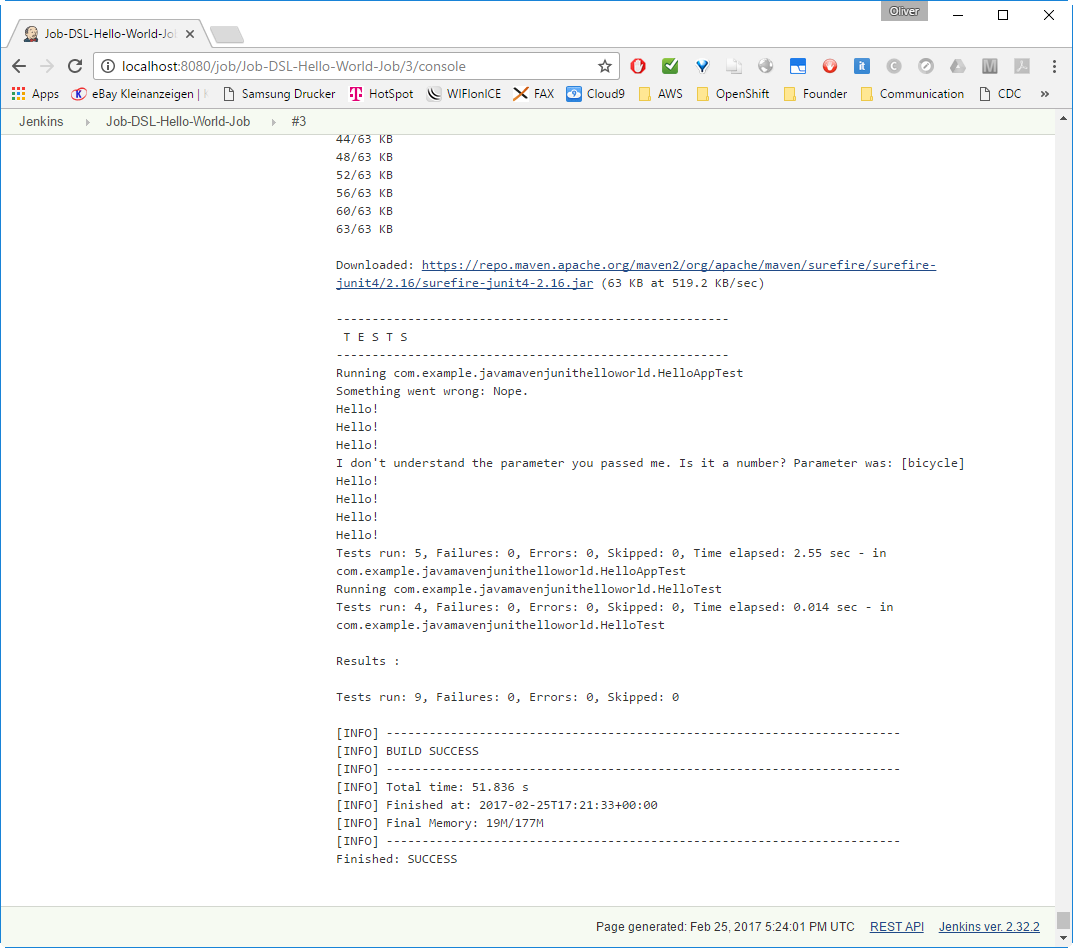
If everything went fine, we will see many downloads and a „BUILD SUCCESS“:
Appendix A: Solve Git Problem: „tell me who you are“
Symptoms: Git Error: status code 128
In a new installation of Jenkins, Git does not seem to work out of the box. You can see this by choosing the Jenkins project Job-DSL-Hello-World-Job on the dashboard, then click „build now“, if the build was not already automatically triggered. Then:
-> Build History
-> Last Build (link works only, if Jenkins is running on localhost:8080 and you have chosen the same job name)
-> ![]()
There, we will see:
Resolution:
Step 1: Enter Git Username and Email
As described in this StackOverflow Q&A: we can resolve this issue by either suppressing the git tagging, or (I think this is better) by adding your username and email address to git:
-> ![]()
-> ![]()
->
-> scroll down to „Git plugin“
-> 
Step 2: Re-run „Build Now“ on the Project
To test the new configuration, we go to
-> the Job-DSL-Hello-World-Job and press
-> ![]()
Now, we should see a BUILD SUCCESS like follows:
-> Build History
-> #nnn
-> ![]()
If everything went fine, we will a „BUILD SUCCESS“:
Appendix B: Maven Error: Cannot run program „mvn“
Symptoms:
When running a Maven Goal, the following error may appear on the Console log:
Resolution:
Perform Step 5
and
For Test, you can test a manual: choose the correct Maven version, when configuring a Maven build step like in Step 7:
and verify that ![]() does not throw the Maven error anymore.
does not throw the Maven error anymore.
For our case, we need to correct the Job DSL like follows:
In the Script, we had defined the step:
However, we need to define the Maven Installation like follows:
Here, the mavenInstallation needs to specify the exact same name, as the one we have chosen in Step 5 above.
After correction, we will receive the correct Maven goal
-> JobDSL -> ![]()
Now, we can check the Maven configuration:
-> ![]()
-> ![]()
-> ![]()
After scrolling down, we will see the correct Maven Version:
DONE
Appendix C: Updating Jenkins
Updating Jenkins (in my case: from 2.32.1 to 2.32.2) was as simple as following the steps below
Note: you might want to make a backup of your jenkins_home though. Just in case…
However, after that, some data was unreadable:

I have clicked
-> Manage Jenkins
-> Manage
-> ![]()
to resolve the issue (hopefully…). At least, after that, the warning was gone.
Appendix D: Job DSL Syntax
The reference for the Job DSL syntax can be found on the Job DSL Plugin API pages. As an example, the syntax of Maven within a Freestyle project can be found on this page found via the path
> freeStyleJob > steps > maven:
// Allows direct manipulation of the generated XML.
configure(Closure configureBlock)
// Specifies the goals to execute including other command line options.
goals(String goals)
// Skip injecting build variables as properties into the Maven process.
injectBuildVariables(boolean injectBuildVariables = true)
// Set to use isolated local Maven repositories.
localRepository(javaposse.jobdsl.dsl.helpers.LocalRepositoryLocation location)
// Specifies the Maven installation for executing this step.
mavenInstallation(String name)
// Specifies the JVM options needed when launching Maven as an external process.
mavenOpts(String mavenOpts)
// Adds properties for the Maven build.
properties(Map props)
// Adds a property for the Maven build.
property(String key, String value)
// Specifies the managed global Maven settings to be used.
providedGlobalSettings(String settingsIdOrName)
// Specifies the managed Maven settings to be used.
providedSettings(String settingsIdOrName)
// Specifies the path to the root POM.
rootPOM(String rootPOM)
A Maven example can be found on the same page:
Summary
In this blog post, we have learned how to
Start and initialize Jenkins via Docker
Prepare the usage of Git and Maven
Install the Job DSL Plugin
Define a Jenkins Job via Groovy script
Create a Jenkins Job by a push of the „Build now“ button
Review and run the automatically created Jenkins job
We have seen that the usage of the Job DSL is no rocket science. The only topic, we had to take care, is, that Git and Maven need to be prepared for first usage on a Jenkins server.
Last updated
Was this helpful?