
Multi-tenancy Setup
Describes multi-tenancy setup for DIGIT
Options
Infra level separation vs logical separation
Recommendations
Multi-tenancy Benefits
Many tenants, one cluster (Multi-tenancy), Why use multi-tenancy and benefits of multi-tenancy?

Multi-tenancy is the more common option for several reasons, but affordability tops the list:
Cost efficiency: Sharing of resources, databases, and the application itself means lower costs per customer. There is no need to buy or manage additional infrastructure or software. All the tenants share the server and storage space, which proves to be cheaper as it promotes economies of scale
Fast, easy deployment: With no new infrastructure to worry about, set-up and onboarding are simple. For instance carving out resources for a new team/project
Built-in security: Isolation between the tenants
Optimum performance: Multi-tenancies allow improve operational efficiency such as speed, utilisation, etc.
High scalability: Service small customers (whose size may not warrant dedicated infrastructure) and large organization's (that need access to unlimited computing resources).
How to implement multi-tenancy?
1. Infra Isolation

(a) Namespaces
Namespaces are the primary unit of tenancy in Kubernetes. By themselves, they don’t do much except organize other objects — but almost all policies support namespaces by default
Require cluster-level permissions to create
Included in Kubernetes natively
Official Kubernetes documentation on namespaces: https://kubernetes.io/docs/concepts/overview/working-with-objects/namespaces/
(b) RBAC: Role based access control for Kubernetes
Kubernetes includes a built-in role-based access control mechanism that enables you to configure fine-grained and specific sets of permissions that define how a given Google Cloud user, or group of users, can interact with any Kubernetes object in your cluster, or in a specific Namespace of your cluster.
Kubernetes RBAC is enabled by default
Official Kubernetes documentation on RBAC: https://kubernetes.io/docs/reference/access-authn-authz/rbac/
(C) Network Policies: To isolate traffic between the namespaces
Network policies allow you to limit connections between Pods. Therefore, using network policies provide better security by reducing the compromise radius.
Network Policies are an application-centric construct which allow you to specify how a pod is allowed to communicate with various network “entities”
Note that the network policies determine whether a connection is allowed, and they do not offer higher level features like authorization or secure transport (like SSL/TLS).
Control traffic flow at the IP address or port level (OSI layer 3 or 4)
Official Kubernetes documentation on Network Policies: https://kubernetes.io/docs/concepts/services-networking/network-policies/
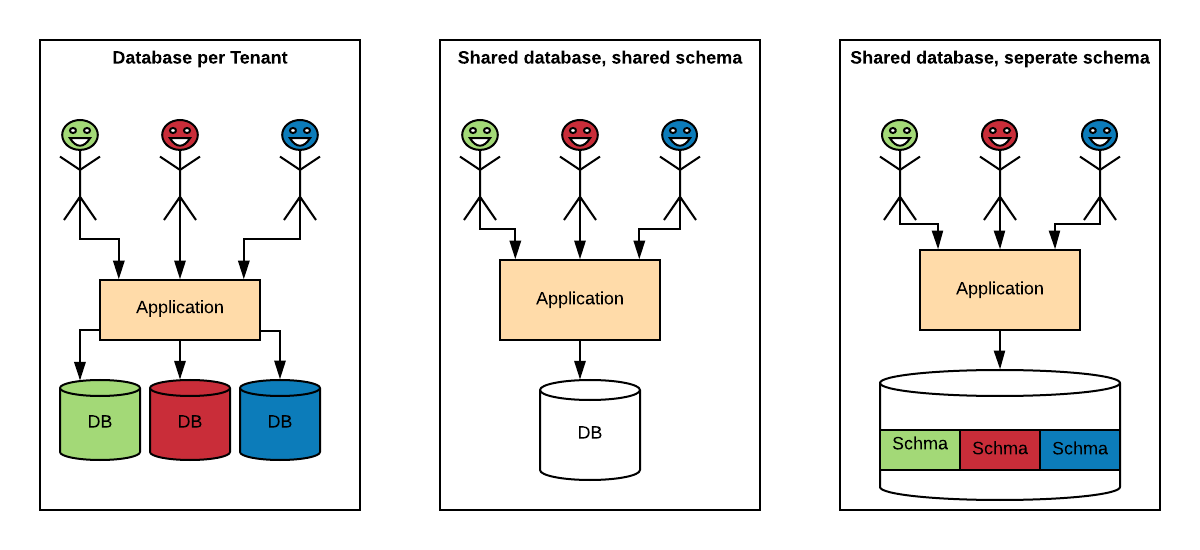
2. Data Isolation:
There are multiple well-known strategies to implement this architecture, ranging from highly isolated (like single-tenant) to everything shared. We can implement multi-tenancy using any of the following approaches:
Database per Tenant: Each Tenant has its own database and is isolated from other tenants.
Shared Database, Shared Schema: All Tenants share a database and tables. Every table has a Column with the Tenant Identifier, that shows the owner of the row.
Shared Database, Separate Schema: All Tenants share a database, but have their own database schemas and tables.
Multi-tenancy Models
Was this helpful?